Some users are experiencing a weird problem on Windows 10 where every single left click gets registered as a double-click. This issue seems to be quite frequent among those users that have recently upgraded to Windows 10 from an older Windows version.
What causes the Windows 10 Mouse Double Clicks on Single Click error
After investigating the issue by looking at various user reports and trying to replicate the issue, we reached a few conclusions:
- The behavior is not specific to a certain Windows 10 build.
- The same behavior is occasionally encountered on the latest builds of Windows 8.1.
- There are no reported cases where the error was determined to be caused by a mouse hardware problem.
Here’s a list with potential items and settings options that other users have identified as culprits:
- Folder Options setting – There is a File Explorer settings item that transforms every left click into double-clicks. The setting can be altered from the Folder Options menu.
- Power Management settings issue – With some mouse models (particularly with wireless models) a power management setting will produce this behavior. Refer to Method 2 for steps on correcting this.
- Multiple HID-compliant mouse entries – After an upgrade to Windows 10, the OS might mistakenly create two different HID-compliant mouse entries which will lead to this behavior.
How to fix the Windows 10 Mouse Double Clicks on Single Click error
If you’re struggling to resolve this particular issue, this article will provide you with a series of approaches that you can use as troubleshooting steps. Below you have a collection of methods that other users in a similar situation have used to resolve the problem.
For the best results, consider starting with the first method and work your way down until you find a method that applies to your particular scenario and resolves the issue. Let’s begin.
Method 1: Changing Double-click settings from File Explorer
It turns out that File Explorer has one setting option that will cause this type of behavior. A manual change or a third party software can alter the default behavior and turn every left-click into an apparent double-click.
Fortunately, you can easily check if this behavior is caused by a File Explorer settings by accessing the View tab from the ribbon at the top. Here’s a quick guide on how to do this:
- Start by opening File Explorer. You can do this easily by pressing Windows key + X and clicking on File Explorer from the newly appeared tab.
- Inside File Explorer, use the ribbon at the top to click on the View tab.
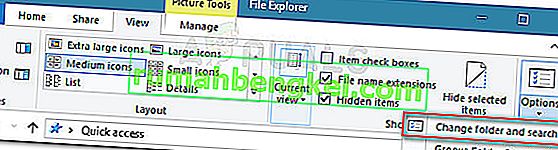
- Inside the View tab, click on Options and then click on Change folder and search options.
- Inside Folder Options, go to the General tab and make sure that Double-click to open an item (single-click to select) is enabled under Click items as follows. If you modified the behavior, click on Apply to save the changes.
- See if the issue has been resolved by single clicking on a folder.

If your system is still double-clicking at every left click, continue down with the next method below.
Method 2: Disabling the Mouse’s Power Management Settings
Some users have been able to fix this particular issue by disabling the power management settings for each USB Root Hub device present in Device Manager.
Note: Keep in mind that other peripherals might be affected by this change in settings.
Here’s a quick guide on using Device Manager to disable the Power Management settings for every USB Root Hub device:
- Press Windows key + R to open up a Run box. Next, type “devmgmt.msc” and hit Enter to open up Device Manager. Click Yes at the UAC (User Account Control) prompt if it appears.

- Inside Device Manager, expand the drop-down menu of Universal Serial Bus Controllers.
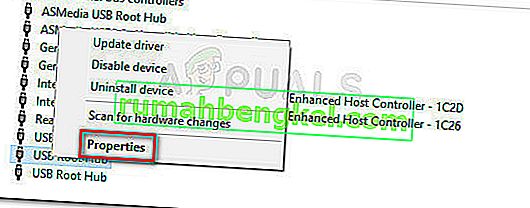
- Next, right-click on the first USB Root Hub device and choose Properties.
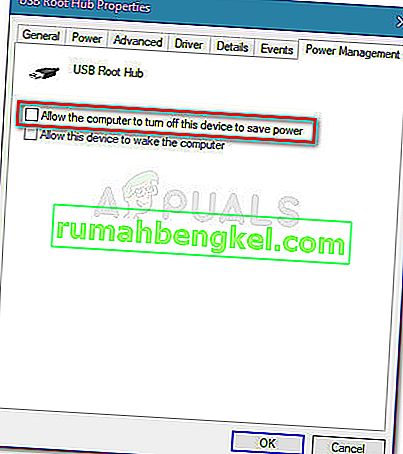
- En las Propiedades del concentrador raíz USB , vaya a la pestaña Administración de energía y desmarque la casilla asociada con Permitir que la computadora apague este dispositivo para ahorrar energía .
- Vuelva al Administrador de dispositivos y repita los pasos 3 y 4 con el resto de entradas de dispositivos USB Root Hub.
- Haga clic en Aceptar para guardar los cambios, luego reinicie su dispositivo y vea si el problema se ha resuelto en el próximo inicio.


Método 3: desinstale las segundas entradas del mouse compatibles con HID
Algunos usuarios que luchan con el mismo problema en Windows 10 han logrado resolver el problema después de descubrir que la pestaña Ratones y otros dispositivos señaladores del Administrador de dispositivos tiene dos entradas de mouse compatibles con HID diferentes. En su caso, la solución fue desinstalar una entrada y reiniciar el sistema.
Aquí hay una guía rápida sobre cómo hacer esto:
- Presione la tecla de Windows + R para abrir un nuevo cuadro Ejecutar. Luego, escriba " devmgmt.msc " y presione Entrar para abrir el Administrador de dispositivos.
- Dentro del Administrador de dispositivos, expanda la pestaña Ratones y otros dispositivos señaladores .
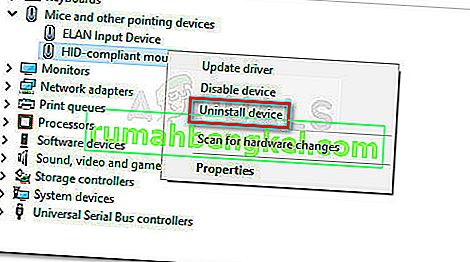
- Si descubre que tiene dos entradas de mouse compiladas por HID diferentes , haga clic con el botón derecho en cualquiera de ellas y seleccione Desinstalar dispositivo .
- Reinicie su computadora y vea si el problema se resuelve en el próximo inicio.

Si el error persiste, continúe con el siguiente método a continuación.
Método 4: uso de MouseFix (para Windows 8.1)
Si se encuentra con este problema en una computadora con Windows 8.1, hay una pequeña utilidad que anteriormente ha ayudado a muchos usuarios a evitar que el mouse haga doble clic con cada clic izquierdo. Esto puede resultar útil si el doble clic es causado por el hardware del mouse o un programa receptor.
MouseFix es un programa de código abierto que implementa ganchos de mouse globales que filtrarán los clics redundantes en función de un umbral. Este programa se escribió pensando en Windows 8.1, por lo que no hay garantía de que funcione para Windows 10.
You can download the utility from this link (here). To use it, extract the archive and place it inside C:\ProgramFiles\MouseFix. Then, create a shortcut of MouseFix.exe and place it inside the Startup folder for easier access (optional).
Finally, reboot your computer and rune Mousefix.exe at the next startup and see if your mouse stops double-clicking.