Los usuarios suelen encontrar este problema después de intentar actualizar Windows 10 a través de Windows Update (WU). El error 0x8024a105señala un problema con los componentes de Actualizaciones automáticas .Normalmente, después de una actualización fallida, los usuarios verán el siguiente mensaje:
“Hubo problemas al descargar algunas actualizaciones, pero volveremos a intentarlo más tarde. Si sigue viendo esto, intente buscar en la web o comuníquese con el soporte para obtener ayuda. Este código de error puede ayudar: (0x8024a105) ".

Si actualmente está luchando con este problema, hemos logrado identificar algunas soluciones viables que han ayudado con éxito a los usuarios en una situación similar a la suya. Siga cada uno de los métodos a continuación en orden hasta que encuentre una solución que logre resolver su problema.
Método 1: ejecutar el solucionador de problemas de Windows Update
Comencemos de manera simple, ejecutando el solucionador de problemas de Windows Update . Algunos usuarios han logrado permitir que las actualizaciones pasen al permitir que el solucionador de problemas incorporado arregle automáticamente los componentes rotos. Aquí hay una guía rápida sobre cómo ejecutar el solucionador de problemas de Windows Update :
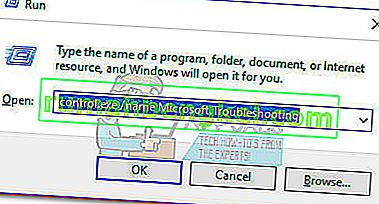
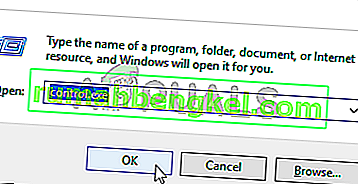
- Presione la tecla de Windows + R para abrir una ventana Ejecutar. Escriba o pegue lo siguiente.
control.exe / nombre Microsoft. Solución de problemas
Presiona Enter para abrir el solucionador de problemas incorporado.
- En la ventana Solucionar problemas , haga clic en Actualización de Windows , luego haga clic en Ejecutar el solucionador de problemas .
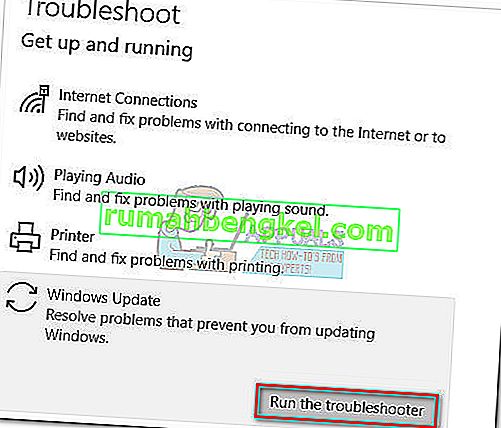
- Espere hasta que el solucionador de problemas detecte problemas con su cliente de actualización. Si logra identificar algún problema con él, siga las instrucciones en pantalla para activar la reparación automática. Por lo general, solo tendrá que elegir Aplicar esta corrección .
- Si el solucionador de problemas de actualización informa que logró reparar algo, reinicie su computadora y vea si el problema se resuelve en el próximo inicio.


Si las actualizaciones siguen fallando con el error 0x8024a105 , baje al Método 2.
Método 2: cambiar la configuración del Control de cuentas de usuario (UAC)
Si el solucionador de problemas no logró solucionar el problema automáticamente, veamos si el problema no es creado por una configuración de Control de cuentas de usuario . Resulta que algunas actualizaciones estaban fallando con el error 0x8024a105 porque la cuenta que inició sesión no tiene los permisos necesarios. Puede solucionar este problema fácilmente cambiando los permisos de Cuentas de usuario relacionados con su cuenta al Administrador. Aquí hay una guía rápida para hacer esto:
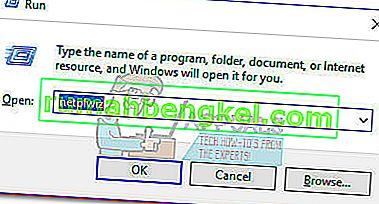
- Presione la tecla de Windows + R para abrir una ventana Ejecutar. Escriba o pegue " netplwiz " y presione Enter para abrir el solucionador de problemas incorporado.
- En la pestaña Usuarios , seleccione el usuario que está utilizando y haga clic en Propiedades.
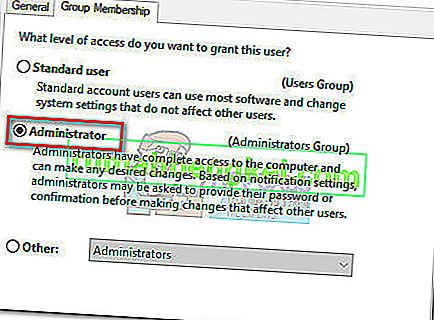
- En la ventana Propiedades , vaya a Membresía de grupo y establezca el nivel de acceso al Administrador . Presione Aplicar para guardar sus cambios.
 Nota: Si el nivel de acceso ya está establecido en Administrador , vaya directamente al Método 3 .
 - Reinicie su computadora y asegúrese de iniciar sesión con la misma cuenta de usuario. Una vez que se complete el inicio, intente realizar las actualizaciones nuevamente. Si ve que fallan con el error 0x8024a105 , vaya al tercer método.

 Nota: Si el nivel de acceso ya está establecido en Administrador , vaya directamente al Método 3 .
Método 3: restablecimiento manual de los componentes de las actualizaciones de Windows
Si los métodos anteriores no han tenido éxito, no tenemos más remedio que restablecer manualmente los componentes de las actualizaciones de Windows y luego reiniciar el proceso de actualización de Windows . De los cuatro métodos presentados, este tiene una mayor probabilidad de éxito, pero requiere más ajustes.
Aquí hay una guía rápida para restablecer los componentes de las actualizaciones de Windows:
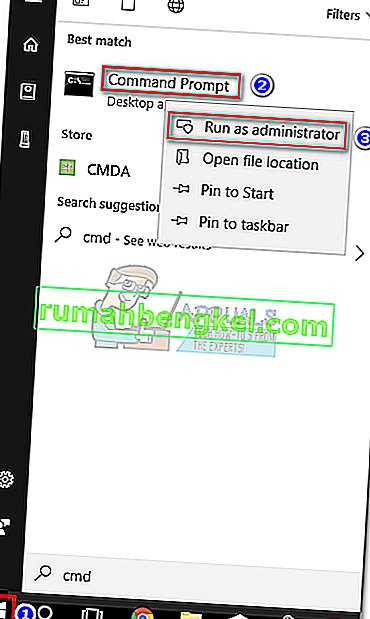
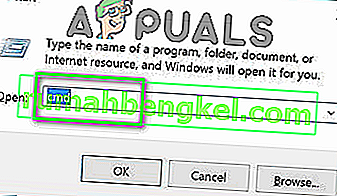
- Haga clic en la barra de Inicio de Windows (esquina inferior izquierda) y busque " cmd ". Luego, haga clic derecho en el símbolo del sistema y elija Ejecutar como administrador .
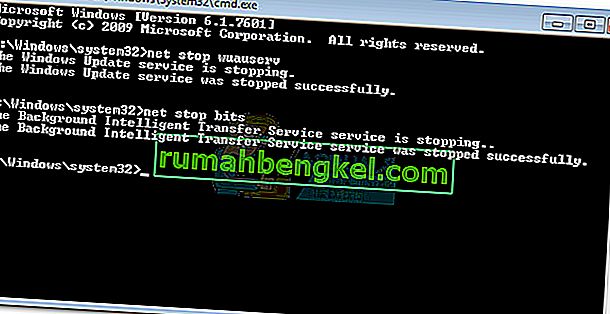
- En el símbolo del sistema elevado, vamos a detener los servicios de MSI Installer, Windows Update, BITS y Cryptographic . Para hacer esto, inserte los siguientes comandos y presione Enter después de cada uno:
net stop wuauserv net stop cryptSvc net stop bits net stop msiserver
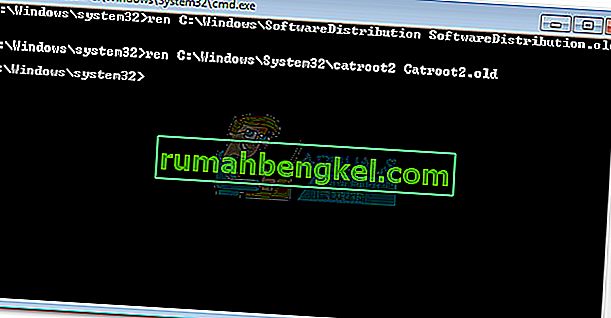
- Una vez detenidos todos los servicios, cambiemos el nombre de la carpeta SoftwareDistribution y la carpeta Catroot2 para obligar a Windows Update a reiniciar sus componentes. Pegue o escriba los dos comandos en el símbolo del sistema elevado y presione Entrar después de cada uno:
ren C: \ Windows \ SoftwareDistribution SoftwareDistribution.old
ren C: \ Windows \ System32 \ catroot2 Catroot2.old
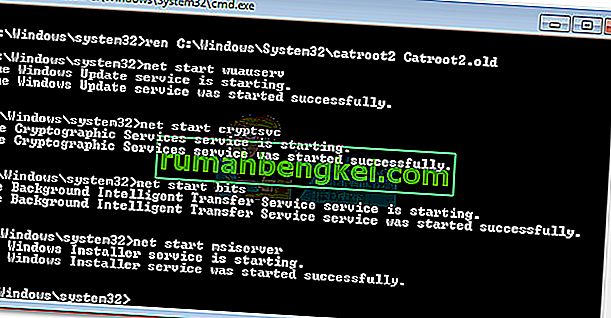
- Una vez que se haya cambiado el nombre de las dos carpetas, es hora de reiniciar los servicios de MSI Installer, BITS, Cryptographic y Windows Update. Para hacer esto, escriba el siguiente comando en el símbolo del sistema y presione Enter después de cada comando:
net start wuauserv net start cryptSvc net start bits net start msiserver
- Una vez que se hayan reiniciado los servicios, cierre el símbolo del sistema elevado y reinicie su computadora.


Método 4: eliminar la carpeta de distribución de software
En algunos casos, el problema se puede solucionar simplemente eliminando una carpeta con Powershell. Por lo tanto, en este paso, primero ejecutaremos PowerShell como administrador y luego eliminaremos la carpeta de distribución de software para iniciar el proceso de actualización. Para eso:
- Presione los botones “Windows” + “X” simultáneamente y seleccione la opción “Power Shell (Admin)” .
- Escribe el siguiente comando y presiona "Enter" para ejecutarlo.
net stop wuauserv
- Nuevamente, escriba el siguiente comando y presione "Enter".
bits de parada netos
- Por último, navegue hasta la siguiente carpeta.
C: \ Windows \ SoftwareDistribution
- Presione “Ctrl” + “A” para seleccionar todo el contenido de la carpeta y presione el botón “Shift” + “Del” para eliminarlos permanentemente.
- Confirme las indicaciones que le advierten sobre la eliminación de estos archivos y luego reinicie su computadora para completar el proceso.
- Ahora, intente actualizar y verifique si el problema persiste.

Una vez que su computadora se reinicie , vea si puede instalar las actualizaciones sin el error 0x8024a105 . Si lo hace, intente realizar un escaneo SFC para solucionar cualquier problema con archivos o controladores faltantes.
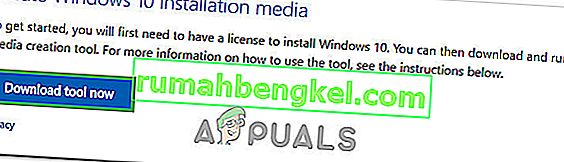
Método 5: Actualizar usando la herramienta de creación de medios
En algunos casos, es posible que no pueda actualizar su computadora mediante el proceso de actualización de Windows predeterminado porque es posible que Windows no pueda establecer una conexión adecuada con los servidores de actualización. Por lo tanto, en este paso, implementaremos la Herramienta de creación de Windows Media para que realice la actualización por nosotros. Descargará e instalará automáticamente los archivos de actualización para actualizar nuestro Windows. Para eso:
- Descargue la herramienta de creación de Windows Media desde aquí.
- Run the executable and follow with the on-screen instructions for the initial setup.
- After the initial setup, select the “Upgrade this PC” option and click on “Next”.
- Accept the License terms and let the installer run.
- The tool will now automatically grab the update files from the servers and update your computer to the latest version available.
- Check to see if doing so has fixed the error.

Method 6: Delete Download Folders
When a new update is downloaded, it is generally stored in some folders on the computer. In this step, we will be deleting some of these folders and which will prompt the operating system to go ahead and download new files which can sometimes clear out the error and the update will be applied normally. For that:
- Press “Windows” + “R” to open the Run prompt.
- Type in “Control Panel” and press “Enter” to launch the classical control panel interface.
- In the Control Panel, click on the “View By:” option and select “Large Icons” from the list.
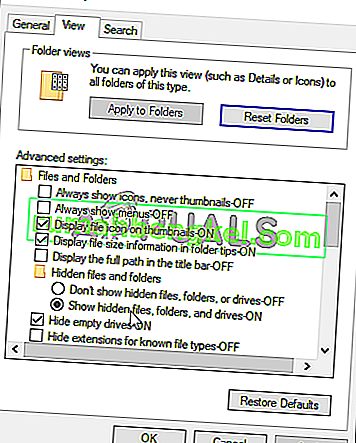
- Click on the “File Explorer Options” and a new window should pop up.
- In the File Explorer Options, click on the “View” button and then double click on the “Files and Folders” button to expand it.
- After that, double click on the ‘Hidden Files and Folders” to expand it as well.
- Check the “Show hidden Files, Folders and Drives” option and click on “Apply” to save your changes.
- Click on “OK” to close out of the window and press “Windows’ + “E” to launch the file explorer.
- In the File Explorer, delete the “$Windows.~WS” and “$Windows. ~BT” folders.
- Make sure to clear out the recycle bin as well so that they cannot be recovered.
- After this, press “Windows’ + “I” to launch settings and click on the “Update and Security” option.
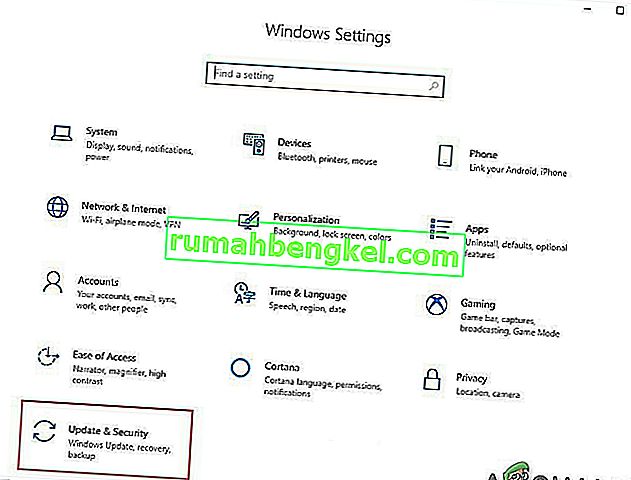
- In Update and Security, click on the “Windows Update” option on the left pane and then click on the “Check for Updates” button.
- Updates will now automatically be downloaded and installed.
- Check to see if the issue persists.


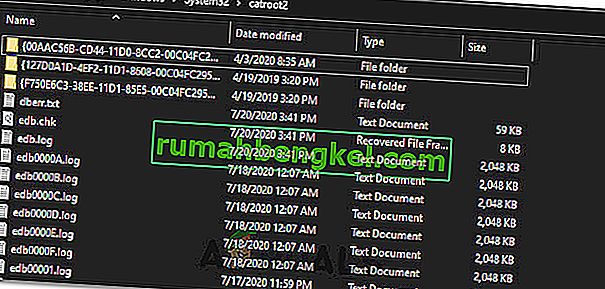
Method 7: Resetting Catroot2 Folder
In some cases, it is possible that the Catroot2 folder and its files have either been corrupted or they have been misconfigured due to which this issue is being triggered. Therefore, in this step, we will first be making some changes from the command prompt and then we will delete the files inside that folder. For that:
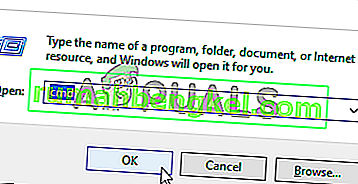
- Press “Windows’ + “R” to launch the run prompt.
- Type in “cmd” and then press “Shift” + “Ctrl” + “Enter” to provide administrative privileges.
- Type in the following command and press “Enter” to execute it.
net stop cryptsvc
- After you have stopped the cryptsvc using the command above, type in the following commands into the command prompt one by one and press “Enter” after each to execute them on your computer.
md %systemroot%system32catroot2.old xcopy %systemroot%system32catroot2 %systemroot%system32catroot2.old /s
- After executing the commands stated above, we will be deleting all the files from the catroot folder without deleting the folder itself.
- Press “Windows’ + “R” to open the Run prompt and type in the following address to navigate to the catroot folder.
C:/Windows/System32/catroot2
- Press “Ctrl” + “A” once inside the folder to select all items inside it and press “Shift” + “Delete” to remove them from your computer.
- After removing these, confirm any prompts that might spring up on your screen.
- After that, open the command prompt back up and execute the following command.
net start cryptsvc
- Try to update your computer and check to see if the issue still persists.


Method 8: Configuring Services to Start Automatically
Sometimes, your computer might be preventing certain services from starting and functioning in the background due to which the update might not be properly installed or configured to be applied on your computer. Therefore, in this step, we will be setting up some services to startup automatically. For that:
- Press “Windows’ + “R” to launch the Run prompt.
- Type in “cmd” and press “Ctrl” + “Shift” + “Enter” to provide admin permissions.

- Type in the following commands one by one in the command prompt and press “Enter” after each to execute them.
SC Config wuauserv start=auto SC Config bits start=auto SC Config cryptsvc start=auto SC Config trustedinstaller start=auto
- This way, we will have configured these services to startup and run automatically in the background.
- Check to see if the issue persists.

Method 9: Re-register Windows Update and BITS Files
It is possible that some windows update files and Bits files might not be properly registered on your computer. Therefore, in this step, we will be re-registering these files on the computer and then we will check to see if that fixes our issue. For that:
- Press “Windows’ + “R’ to open the Run prompt.
- Type in “cmd” and then press the “Ctrl” + “Shift” + “Enter” buttons to provide admin permissions.
Type in the following commands one by one and press “Enter” after each to register the components.regsvr32.exe atl.dll regsvr32.exe urlmon.dll regsvr32.exe mshtml.dll regsvr32.exe shdocvw.dll regsvr32.exe browseui.dll regsvr32.exe jscript.dll regsvr32.exe vbscript.dll regsvr32.exe scrrun.dll regsvr32.exe msxml.dll regsvr32.exe msxml3.dll regsvr32.exe msxml6.dll regsvr32.exe actxprxy.dll regsvr32.exe softpub.dll regsvr32.exe wintrust.dll regsvr32.exe dssenh.dll regsvr32.exe rsaenh.dll regsvr32.exe gpkcsp.dll regsvr32.exe sccbase.dll regsvr32.exe slbcsp.dll regsvr32.exe cryptdlg.dll regsvr32.exe oleaut32.dll regsvr32.exe ole32.dll regsvr32.exe shell32.dll regsvr32.exe initpki.dll regsvr32.exe wuapi.dll regsvr32.exe wuaueng.dll regsvr32.exe wuaueng1.dll regsvr32.exe wucltui.dll regsvr32.exe wups.dll regsvr32.exe wups2.dll regsvr32.exe wuweb.dll regsvr32.exe qmgr.dll regsvr32.exe qmgrprxy.dll regsvr32.exe wucltux.dll regsvr32.exe muweb.dll regsvr32.exe wuwebv.dll
- After executing the commands listed above, check to see if the issue still persists.

Note: After trying the following fixes, if the issue still persists, try to perform a clean boot and check if that fixes it. If it does, update in the clean boot and then get out of it after the update is completed. If that doesn’t work, try to go for a clean install of Windows.