Some users have been complaining about using the ability to print directly from Chrome. Almost all affected users are reporting suddenly losing the ability to print from Chrome after doing it successfully for a long period of time.
Most of the time, users report receiving the Aw-Snap! error while they trigger the printing sequence in Chrome.

If you’re currently struggling with this issue, the following fixes might help. We have managed to identify a few methods that have been successful for users in a similar situation to resolve the issue. Please follow the methods below in order until you encounter a fix that works for your situation.
Method 1: Using the Ctrl + Shift + P shortcut (workaround)
If you’re looking for a quick fix that will spare you from going through time-consuming steps, using the Ctrl + Shift + P shortcut might just enable you to get around the issue.
However, keep in mind that this should only be regarded as a workaround since it doesn’t fix the underlying issues that caused Google Print to malfunction.
If this workaround isn’t effective or if you’re looking for some steps that will resolve the underlying issues, continue with the method below.
Method 2: Deleting the extra printers on Google Print
Some users have been able to resolve the issue without having to uninstall the browser by making sure the printers listed under Google Cloud Print are properly managed.
As it turns out, whenever Google Cloud Print has more than one listed active printer it might create issues that will prevent users from printing directly from Chrome.
To remedy this issue, you’ll have to delete the extra printers that you don’t use. Here’s a quick guide on how to do this:
- Open Google Chrome, hit the action box (top-right corner) and click on Settings.
- In the Settings list, scroll all the way down and click on Advanced to expand the drop-down menu. Then, scroll down through the Advanced list and click on Google Cloud Print under Printing.
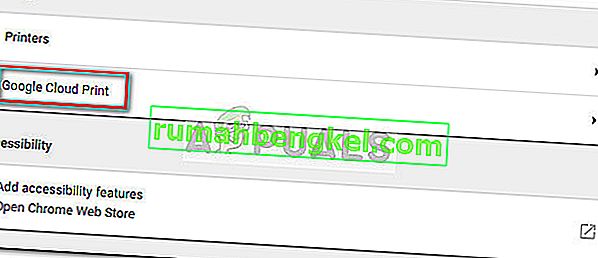
- Next, click on Manage Cloud Print devices and click the Manage button associated with every printer that you’re not currently using then delete it.
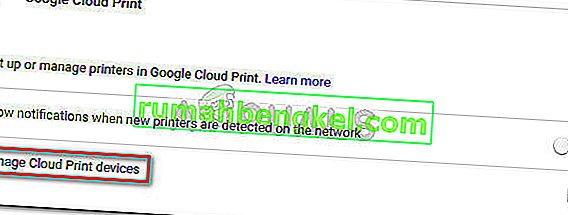
- Once you’re only left with one active printer, restart Google Chrome and see if the issue has been resolved and you’re able to print directly from the browser. If you aren’t, move down to the method below.
Method 3: Deleting local browsing history then uninstall Chrome
Most users have been able to resolve the issue after uninstalling Chrome along with the local browsing history. Upon reinstalling the newest Chrome version available, most users have reported regaining the ability to print directly from Chrome.
Here’s a quick guide to deleting the local browsing history, uninstalling Chrome and reinstalling it again:
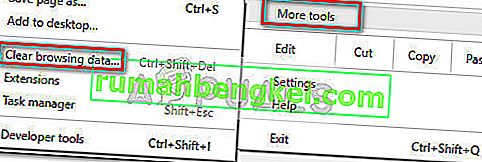
- Open Google Chrome, hit the settings menu and go to More tools > Clear browsing data.
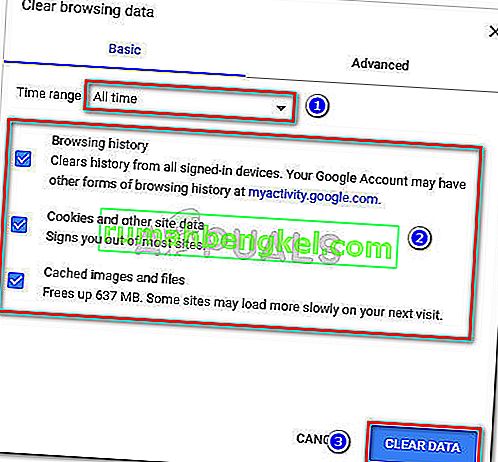
- Next, set the time range to All time and make sure the boxes associated with Browsing history, Cookies and other site data and Cached images and files are checked. Then start the deletion process by clicking on Clear Data. Once the process is complete, you can safely close Google Chrome.
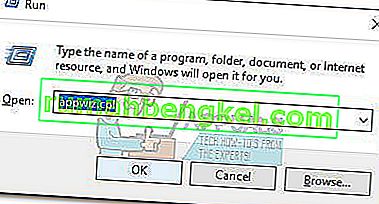
- Press Windows key + R to open up a Run command. Then, type “appwiz.cpl” and hit Enter to open Programs and Features.
- In Programs and Features, scroll down through the application list, right-click on Google Chrome and choose Uninstall. If you’re asked whether you want to delete the local browsing history of Chrome, accept and hit Next to continue.
- Once Chrome is uninstalled, reboot your computer and use the default browser to navigate to this link and download the last version installer of Chrome.
- Open the installer and follow the on-screen prompts to install Chrome and check if you’re now able to print directly from Chrome.
If this method didn’t work, start following the other methods below.
Method 4: Claiming Full Control over the Temp folder
Some users have been finally able to resolve the issue after tweaking the permissions of the temp folder (within the AppData update). Apparently, giving yourself full control over the temp folder will restore the ability to print directly from Google Chrome.
Although this is purely speculation, it’s widely believed that a WU update has modified the permissions for already-installed browsers.
Note: This method seems to be effective for users that are able to print from Internet Explorer but are prevented from printing on Google Chrome, Firefox, and any other 3rd party browser.
Here’s a quick guide to claiming Full Control over the temp folder in order to restore the printing ability in Google Chrome:
- Navigate to C:\ Users \ *Your User Name* \ AppData \ Local, right-click on the temp folder and choose Properties.
- In Temp Properties, go to the Security tab, select the first account under Group or user names, click Edit and make sure the Allow box associated with Full Control is ticked. Then, repeat the same procedure with all accounts under Group or user names.
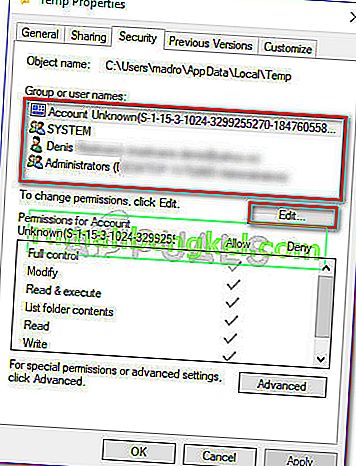
- Reboot your system. Starting with the next restart, you should be able to print from all 3rd party browsers including Google Chrome.
If the method hasn’t managed to resolve your issue, move down to the final method.
Method 5: Repairing the Print Spooler driver
If all the methods above have been a bust, there’s a high chance that the print spooler driver or another Windows component tasked with handling a printing chore has become corrupted and unusable. This is most certainly the culprit if you notice that you’re PC is unable to print from anywhere else (any 3rd party app) than on Microsoft’s channels.
As some users have pointed out, it’s very likely that certain files located in SYSWOW64 need replacing. If that’s the case, you’re the best chance of resolving the issue without having to reinstall your OS is to trigger a system repair.
To trigger a system repair, we’re going to use System File Checker – a Windows utility that scans for system file corruption and replaces the corrupted files. Here’s a quick guide on how to trigger a System File Checker scan to fix the printing problem on Google Chrome:
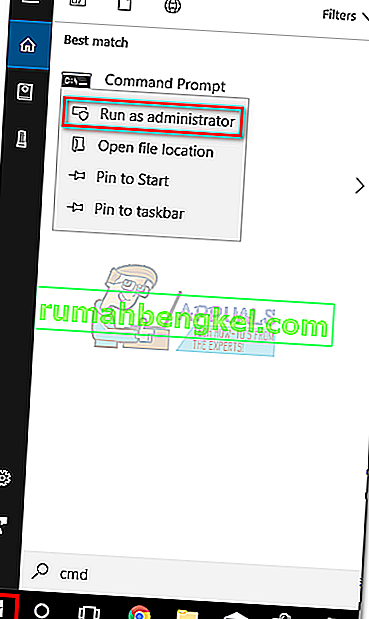
- Access the Windows start menu (bottom-left corner) and search for “cmd“. Then right-click on Command Prompt and choose Run as administrator.
- In the elevated command prompt, type the following command and press Enter to start the operation:
DISM.exe /Online /Cleanup-image /Restorehealth
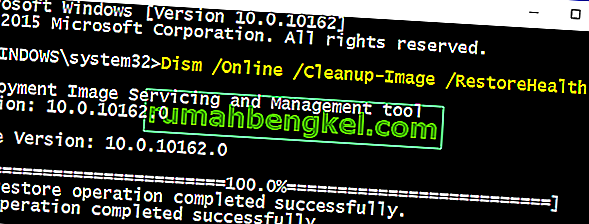 Note: Keep in mind that the DISM command uses WU (Windows Update) to fetch the files that will end up replacing the corrupted once. Because of this, you’ll need to make sure that your internet connection is active and stable, otherwise, the attempt will end up in failure.
 - Once the DISM operation is completed, you can finally initiate the System File Checker tool. To do this, type the following command in the elevated Command Prompt and press Enter:
sfc /scannow
 Note: Once the process is kickstarted, the SFC utility will scan all protected system files and replace the corrupted occurrences with new and fresh copies. It’s important that you don’t close the elevated Command Prompt window until the process is complete.
 - Once the process is complete, close the elevated Command Prompt and reboot your computer. At the next startup, check if the printing issue has been resolved and you’re able to print from 3rd party applications.
Method 6: Resetting Chrome to Default Settings
Some users reportedly got around this issue by resetting Chrome back to its default settings. We will be doing exactly that in this method. In order to do that:
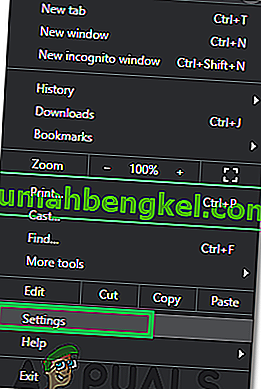
- Launch Chrome and click on the “Three Dots” on the top right corner.
- Select “Settings” from the list and scroll down.
- Under the “Reset and Cleanup” heading, click on the “Reset Google Chrome to its Defaults” option.
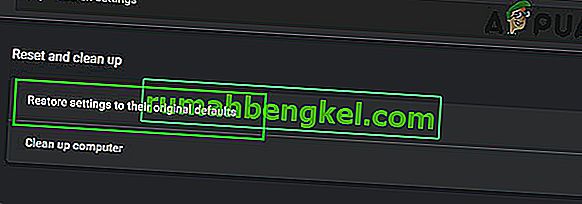
- Check to see if the issue persists after the reset.
Note: Also, download the following apps and install them.
XPX Essential
NET 3.0
NET 3.5


 Note: Keep in mind that the DISM command uses WU (Windows Update) to fetch the files that will end up replacing the corrupted once. Because of this, you’ll need to make sure that your internet connection is active and stable, otherwise, the attempt will end up in failure.
 Note: Once the process is kickstarted, the SFC utility will scan all protected system files and replace the corrupted occurrences with new and fresh copies. It’s important that you don’t close the elevated Command Prompt window until the process is complete.


