El error 0xc000000e al intentar iniciar Windows significa que se trata de datos de configuración de inicio dañados . Los datos de configuración de arranque son un almacén global para todas las opciones y configuraciones relacionadas con el arranque en PC con Windows más nuevas.
Obtendrá este error cuando intente iniciar su dispositivo, y se le presentará una pantalla negra que le dará instrucciones sobre cómo reparar su computadora usando un disco de instalación o una unidad de recuperación. Desafortunadamente, tener esa unidad de recuperación es la única forma de resolver este problema, por lo que debe tener una antes de comenzar. Si no lo tiene, es bastante fácil crear uno usando Rufus o la herramienta de creación de Windows Media desde cualquier otra PC o computadora portátil.

También deberá iniciar en su BIOS para cambiar el orden de inicio y hacer que su PC se inicie desde la unidad de recuperación en lugar de su disco duro. Para hacer eso, siga los siguientes pasos:
- Ingrese la configuración de BIOS o UEFI presionando la tecla designada por el fabricante de la placa base antes de que Windows arranque. Esta tecla suele ser Esc, Eliminar, F2, F8, F10, F12 o Retroceso, según el fabricante. Puede hacer una búsqueda en línea sobre cómo ingresar al BIOS, seguido del modelo de su computadora.
- Una vez dentro, navegue hasta el inicio Utilice las instrucciones que se encuentran en el BIOS para cambiar el orden de inicio y configure el CD-ROM o el puerto USB para que sea el primer dispositivo, dependiendo de si su unidad de recuperación es un CD o una unidad flash .
- Guarde su configuración y salga.

Método 1: reconstruir los datos de configuración de arranque
Para hacer esto, deberá iniciar su computadora desde la unidad de recuperación. Si ha configurado su BIOS con los pasos anteriores, puede hacerlo presionando cualquier tecla una vez que aparezca el mensaje en su pantalla. Una vez que la computadora se inicia desde la unidad de recuperación, siga los siguientes pasos para reconstruir el BCD:
- En el cuadro de diálogo Configuración de Windows , configure todo con los valores apropiados, seleccione su idioma y haga clic en
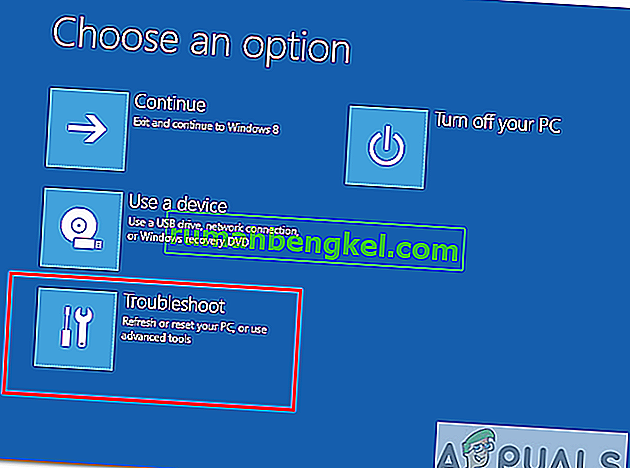
- En la esquina inferior izquierda, haga clic en Reparar su computadora y elija Solucionar problemas en la pantalla Elegir una opción.
- En la pantalla Solucionar problemas , haga clic en Opciones avanzadas y haga clic en Símbolo del sistema.
- Cuando se abra el símbolo del sistema, escriba los siguientes comandos y presione Entrar en su teclado después de cada uno de ellos:
bootrec / scanos bootrec / fixmbr bootrec / fixboot bootrec / rebuildbcd
- Reinicie su computadora, y debería iniciarse bien, sin enfrentar el problema nuevamente.

Método 2: repare su sistema operativo con la unidad de recuperación
Este método también reparará su sistema operativo con el símbolo del sistema de la unidad de recuperación, y debería poder iniciar Windows sin enfrentar el problema nuevamente. Inicie desde la unidad de recuperación y siga las instrucciones a continuación.
- Siga los pasos del 1 al 3 del método anterior para acceder al símbolo del sistema de la unidad de recuperación.
- Una vez dentro del símbolo del sistema, escriba los comandos a continuación, seguidos de Enter en su teclado para ejecutarlos. La utilidad StartRep.exe corrige los valores del entorno de arranque y debería corregir el error BCD. Tenga en cuenta que es posible que deba repetir este paso varias veces en caso de que falle.
cd x: \ sources \ recovery StartRep.exe
- Si el paso anterior de reparación de Windows no ayudó, escriba bcdedit en el símbolo del sistema para ver los valores del Administrador de arranque de Windows.
- Tenga en cuenta los valores de Device . Si son desconocidos , escriba los siguientes comandos, cada uno seguido de un Enter para ejecutarlos. Tenga en cuenta que debe reemplazar C: con la partición donde está instalado su sistema operativo, si es necesario.
bcdedit / set {DEFAULT.EN_US} partición del dispositivo = c: bcdedit / set {DEFAULT.EN_US} partición osdevice = c: bcdedit / set {BOOTMGR.EN_US} partición del dispositivo = c:- Cuando termine el símbolo del sistema, ciérrelo, retire la unidad de recuperación y reinicie su sistema. No debería tener problemas para arrancar ahora.
El único inconveniente de estas soluciones es que requieren un impulso de recuperación, paciencia y nervios fuertes. Sin embargo, si los sigue como se describen, debe corregir el error que ha estado recibiendo y continuar usando su dispositivo como antes.
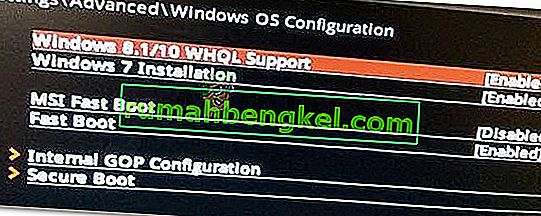
Método 3: habilite la compatibilidad con WHQL de Windows 10 en el BIOS
La configuración de compatibilidad con Windows 10 WHQL existe en algunos de los OEM. Tiene dos funciones básicas: comprueba los controladores firmados durante el proceso de arranque y le permite habilitar la compatibilidad con UEFI. Si está utilizando Windows 10, debe habilitarlo y luego su computadora puede arrancar normalmente. Sin embargo, si no está seleccionado, su computadora puede arrancar con el error 0xc000000e. Por lo tanto, puede acceder al BIOS para ver si la configuración de compatibilidad con Windows 10 WHQL está habilitada. Si no es así, habilítelo para intentarlo.
Debe tener en cuenta que la configuración de compatibilidad con WHQL de Windows 10 no es compatible con todas las computadoras. Si su computadora no lo tiene, puede verificar si el soporte UEFI está habilitado en su computadora. De lo contrario, puede habilitarlo para ver si desaparece el código de error 0xc000000e. Para habilitarlo:
- Apague la computadora por completo y déjela reposar durante al menos un par de minutos.
- Después de asegurarse de que haya pasado el tiempo adecuado, reinicie la computadora y verá la opción " Presione este botón para iniciar en el modo Bios ".
- Presione el botón para iniciar el modo Bios.
- Después de arrancar con éxito dentro del modo Bios, verifique si hay una configuración de Windows WHQL en Bios.
- Si está presente, presione "Enter" para seleccionarlo después de resaltarlo usando las teclas de flecha, y seleccione la opción "Habilitado" para habilitarlo en su computadora.
- Verifique si esto resuelve el problema.

Si el error de arranque de Windows 10 0xc000000e aún aparece después de habilitar la configuración de compatibilidad con Windows 10 WHQL o la compatibilidad con UEFI, es posible que deba restablecer la configuración de BIOS / UEFI en su computadora.
Método 4: Reconstruir BCD a través de Easy Recovery Essentials
Easy Recovery Essentials es una función de reparación automática del sistema con un solo clic que incorpora la reparación y reconstrucción completas del BCD para resolver el error "0xc000000e", incluso en los casos en que Windows no se inicia como resultado del error.
El componente de reparación de arranque automático de EasyRE abordará todos los problemas relacionados con BCD, reparando el BCD o recreándolo desde cero utilizando la codificación y la ruta correctas para la partición que se niega a cargar correctamente. También marcará el disco como en línea para asegurarse de que funcione correctamente.
Se garantiza que Easy Recovery Essentials solucionará el error "0xc000000e" automáticamente mediante su opción de reparación automatizada incorporada. EasyRE está disponible actualmente para Windows XP, Vista, 7, 8, 10 y se puede descargar y crear en cualquier PC.
- Consiga otra computadora que pueda usar para crear un USB que usaremos para iniciar la computadora.
- Descargue Easy Recovery Essentials desde aquí.

- Grabe la imagen.
- Inicie su PC desde el CD o USB Easy Recovery Essentials que creó.
- Una vez que EasyRE se esté ejecutando, elija la opción "Reparación automatizada" y haga clic en Continuar.
- Después de que EasyRE escanee las unidades de su computadora, identifique y seleccione la letra de unidad para su instalación de Windows de la lista, y luego haga clic en la Opción de reparación automatizada para comenzar.
- Easy Recovery Essentials comenzará a analizar la unidad seleccionada en busca de problemas. EasyRE probará e intentará corregir automáticamente los errores del disco, la partición, el sector de arranque, el sistema de archivos, el cargador de arranque y el registro. No se requiere intervención, ya que la reparación de EasyRE está completamente automatizada.
- Una vez que se complete el proceso, EasyRE informará sus hallazgos. Haga clic en el botón Reiniciar para reiniciar su PC y probar los cambios.

Método 5: Restablecer la configuración de BIOS / UEFI
Algunos usuarios dijeron que su problema de error 0xc000000e se resuelve restableciendo la configuración de BIOS / UEFI. Por lo tanto, puede considerar probar este método para ver si este problema se puede resolver.
Paso 1. Abra el menú de la BIOS
Para restablecer la BIOS a la configuración predeterminada, primero debe acceder al menú de la BIOS y buscar la opción Configuración predeterminada.
Los usuarios de Windows 10 pueden acceder a las opciones de inicio avanzadas de Windows 10 y acceder al menú del BIOS. Puede hacer clic en Inicio -> Encendido, presionar y mantener presionada la tecla Shift y hacer clic en el botón Reiniciar para reiniciar Windows en el Entorno de recuperación de Windows. Luego haga clic en Solucionar problemas -> Opciones avanzadas -> Configuración de firmware UEFI y haga clic en Reiniciar para ingresar a la pantalla de configuración del BIOS.
Alternatively, you can also restart your computer normally and press the required key in the startup screen to boot into the BIOS settings window. The hotkey is varied from different computer manufacturers, and it could be F12, Del, Esc, F8, F2, etc.
Step 2. Find the Setup Defaults Option
The name and location of the “Setup Defaults” option may be different from various computers. It generally calls like: Load Default, Load Setup Defaults, Load Default Settings, Load BIOS Defaults, Load Optimal Defaults, etc.
Use the arrow keys on the computer keyboard to find the BIOS setup default option in the BIOS settings screen. You may find it in one of the BIOS tabs.
Step 3. Reset BIOS
After you find the Load Setup Defaults option, you can select it and press the Enter button to start resetting the BIOS to factory default settings in Windows 10.
At last, you can press F10 to save and exit BIOS. Your computer will automatically reboot. If you need to change BIOS settings again in the future, you can follow the same instructions to access BIOS again to change it.
Method 6: Mark Boot Disk As Online
It is possible in some cases, that the disk that you have connected to the computer or the USB that you are trying to boot from has been marked as offline by the computer. Some computers tend to prevent extra applications, hardware, and other things from being able to run as soon as the computer starts because it allows for more convenient and fast startup experience. Therefore, in this step, we will be marking the Disk as online.
You still need to use a bootable USB medium to do this job. We will show you a step-by-step guide here:
- After booting your computer from the bootable USB drive, you need to go to Next > Repair your computer. Then, you will enter WinRE.
- Go to Troubleshoot > Advanced options > Command Prompt.

- Make sure to properly enter your login credentials if you are asked by the computer.
- Type in the following command inside the command prompt to successfully launch the disk part utility on your computer.
diskpart
- Type in either one of the following commands in the next window to list the currently connected disk drives to your computer.
List Disk List Volume
- Once the disks have been listed, you need to identify the disk that contains the Windows operating system and the one that you want to mark as active.
- After identifying it, select the disk using the following command and replacing the alphabet with the driver letter of that disk.
select disk A Select Volume A (Replace A with the Drive Letter)
- After you have successfully selected the disk, you must mark the disk as online in order to initiate the recognization process of the disk at startup. Use the following commands to do that.
Online Disk Online Volume
- Type in the following command to successfully get out of the command prompt and restart your computer after that.
Exit
- Check to see if marking the Disk as online has fixed your issue.

Method 7: Check your data cables, BIOS and drivers
Unplug all HDD data cables, and then plug them again. Revert to the previous drivers and BIOS settings if they were changed, or use “Restore factory settings” option in the BIOS. Make sure to write down all current BIOS settings that were previously selected, just in case it is required to switch back. If the error is caused by a change of the SATA disk controller’s mode in the BIOS or firmware, the fix can be as simple as entering the BIOS and toggling the SATA controller’s “mode” setting. The exact instructions differ from one manufacturer to the other, but the options will resemble what is shown in the screenshots below.
To check the boot order, follow these steps:
- Restart the computer
- Press the necessary key to open the BIOS menu. This key depends on the computer manufacturer and computer model. This is usually listed on the first screen that appears on the monitor. It can be any of the following: Esc, Del, F2, F8, F10 or F12.
- If the screen shows multiple keys, find the key to open “BIOS”, “setup” or “BIOS menu”
- Attempt to toggle between all three (or more) modes until a combination that results in Windows booting successfully once more is found.
Method 8: Boot Windows In Safe Mode
If above solutions didn’t fix the problem, then Start Windows into safe mode. This will start your PC with minimum system requirements, will not load startup programs, add-ons etc. And allow performing troubleshooting steps to fix Boot Error 0xc000000e:
Before you enter the safe mode, you need to enter the Windows Recovery Environment (winRE). To do this, you will repeatedly turn your device OFF, then ON:
- Hold down the power button for 10 seconds to turn off your device.
- Press the power button again to turn on your device.
- On the first sign that Windows has started (for example, some devices show the manufacturer’s logo when restarting) hold down the power button for 10 seconds to turn off your device.
- Press the power button again to turn on your device.
- When Windows restarts, hold down the power button for 10 seconds to turn off your device.
- Press the power button again to turn on your device.
- Allow your device to fully restart and you should boot into the Windows Recovery Environment.
Now that you are in the Windows Recovery Environment, you will follow these steps to take you to safe mode:
- On the Choose an option, screen, select “Troubleshoot” and then “Advanced options.”
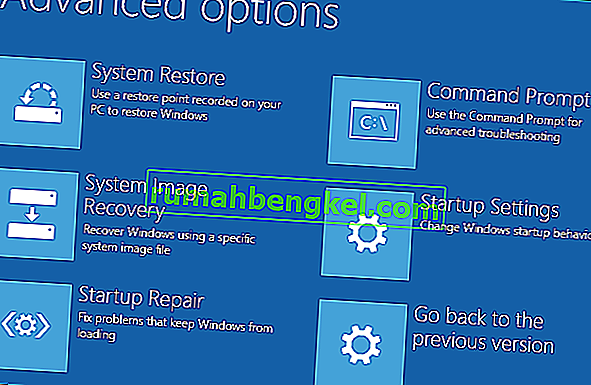
- Now click on “Startup Settings” and click on “Restart.”
- After your device restarts, you’ll see a list of options. Select option “4” from the list or press “F4” to enter Safe Mode.

Note: If you need to exit safe mode, simply restart your device, or:
- Press the “Windows logo key + R.”
- Type “msconfig” in the Run box and then select “OK”.

- Select the Boot tab and under Boot options, clear the Safe boot checkbox.

Method 9: Check your disk with CHKDSK utility
If the hard drive has its file integrity compromised, it is possible to use built-in Windows CHKDSK utility to scan the disk and fix the file system errors.
- Connect a USB drive that has been made bootable or insert the Windows Installation Disk on your computer.
- After connecting one of these, boot from that connected device.
- After booting your computer from the device, click on “Next” and then on the “Repair your Computer” option.
- On the next window, click on “Troubleshoot” and then on the “Advanced” Option.

- On the next screen, make sure to select the “CommandPrompt” option to successfully launch into the command prompt.
- Provide the login credentials of your account in order to boot inside the cmd.
- Inside the command prompt, type in the following command to successfully run the check disk utility on your computer.
chkdsk C: /f (Make sure to replace the "C" with the Drive letter of your partition).
- Confirm any on-screen prompts and wait for the scan to be fully completed.
- Check to see if the issue is fixed by performing this step.
Method 10: Disable fast startup Feature
If your computer has been set up to use the Fast Startup feature, you might be getting this error message on your screen because of doing so. The Fast Startup feature is known to malfunction with some operating systems and hardware combinations.
Basically, when enabled, the feature automatically sends some launch configurations to be stored in your RAM to allow for a faster startup as indicated by its name but this configuration data can sometimes be corrupted which can lead to this error on your computer. Therefore, in this step, we will be disabling it completely. For that:
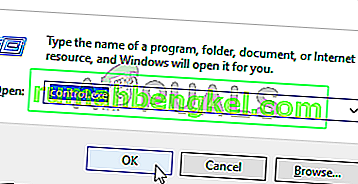
- Press “Windows” + “R” to open the Run prompt.
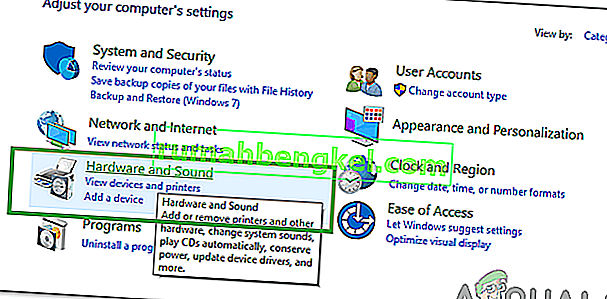
- Type in “Control Panel” and press “enter” to launch the classical Control Panel interface.
- Inside the control panel, click on the “Hardware and Sound” option and then select the “Power Options” button.
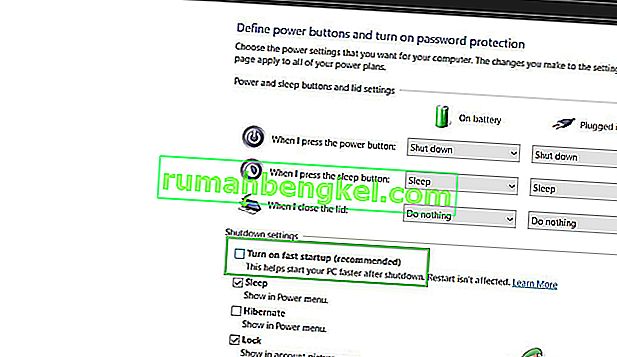
- Inside the power options, click on the “Choose what the power button does” from the left side.
- Click on the “Change Settings” option if the fast startup option is greyed out.
- Make sure to uncheck the “Turn on Fast Startup” option and save your changes.
- Closeout of the window and terminate any unnecessary applications.
- Click on the “Start Menu”, click on the “Power Options” and select “Shutdown” from the list.
- This option should completely power down your computer and after performing a complete shutdown, wait for some minutes before turning your computer back on.
- After the computer turns back on, check to see if the error message is fixed.
Note: This solution can only be applied if you are able to sometimes boot up your computer normally and are only encountering this error momentarily.


Method 11: Repair Corrupted System Files
It also possible in some situations that certain system files might have been corrupted due to a storage failure or due to some other reason. Therefore, in this step, we will be performing a complete repair of the corrupted system files and then we will check to see if doing so fixes this issue. For that:
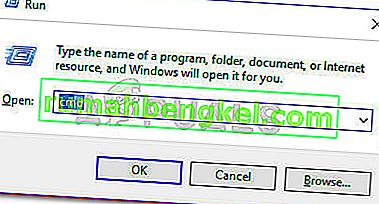
- Press “Windows” + “R” to open the Run prompt.
- Type in “cmd” and then press “Shift” + “Ctrl” + “Enter” to launch the command prompt with admin privileges.
- Type in the following commands one by one and press “Enter” after each to successfully run an SFC scan and a DISM Scan on your computer.
DISM /Online /Cleanup-Image /RestoreHealth sfc /scannow
- Restart your computer completely once these scans are completed.
- Check to see if by performing these scans, you were able to fix this issue on your computer.

Method 12: Run Windows Startup Repair
Startup Repair is capable of diagnosing and fixing the found issues. For example, it can automatically scan system files, registry settings, configuration settings, etc. and try to fix the problem on its own. Startup Repair is especially useful when your computer is unbootable. Since your computer fails to boot, Windows can boot into WinRE automatically. While, if it doesn’t appear, you can interrupt the boot process three times in a row, and then the WinRE screen appears. Alternatively, if you have a bootable USB medium, you can also set your computer to boot from it and go to Repair your computer to enter WinRE.
After you have successfully booted into the Windows Recovery Environment, click on the “Troubleshoot” option, and from there, select the “Advanced Options” screen. Inside the advanced options, select the “StartupRepair” button to successfully initiate the Startup Repairing process. Windows will begin to diagnose your computer automatically. When the process ends, your computer will restart automatically. You can wait to see whether it can boot successfully.

Solución alternativa: asegúrese de que no haya dispositivos adicionales enchufados antes de saltar a la línea de comandos o Reparación de inicio; es mejor intentar otro reinicio con la menor cantidad de dispositivos y unidades externas conectadas a la computadora. Esto asegurará que nada de lo que se agregó recientemente a la computadora no esté causando este problema. Sería mejor desenchufar cualquier unidad USB, CD, DVD, etc. reciente. Esto también incluye un lector de tarjetas de memoria. Asegúrese de que todas las unidades externas y llaves USB o unidades de salto USB se hayan desconectado, luego intente nuevamente.