When you attempt to login to your account on Windows you receive the following error “The User Profile Service failed the logon” which is due to your user profile is corrupt after a windows update or a malware. Not only you, but many others are affected by this issue. The fix is pretty easy and simple for this issue.
To fix this issue please follow the steps below. Before you begin, please bookmark this page so you can access it during the steps because it requires restarting system and re-accessing this page.
- Restart your computer and repeatedly tap F8 until you see the Advanced Boot Menu.
- If you do not see this menu, start over again and repeatedly tap the F8 key on your keyboard until you see this.
- When you see this select Safe Mode with Networking.
- You will be able to login to safe mode fine.
On the Advanced Boot Menu, select Safe Mode with Networking using the arrow keys on your keyboard. Hit Enter to start the computer in Safe Mode with Networking. The picture below shows Safe Mode only, but you need to select “Safe Mode with Networking”

After you have logged in again in the safe mode with networking, Click the Start button and type system restore in the Start Menu‘s search and hit Enter OR open run and type rstrui.exe then Click OK. You can open run by holding the windows key and pressing R.
Click the System Restore option from the search.
After it loads up, place a check on Show More Restore Points and click Next.

Select a restore point by looking at the dates when your computer was working fine. Click Next and Finish.
If there are no restore points available, then follow this approach-> adding user via command lineThe computer will begin a system restore and will reboot. After it has rebooted, login to your computer in the normal mode.
Now download Restoro by clicking the here and run the program. It will take a while for it to finish scanning. Once it has scanned, and if it has found problems, repair them using the program. Once this is done, Click Start and type cmd in the search box. Right-click cmd and select run as administrator. This will open a black command prompt, inside the black prompt type:
sfc /scannow
Now hit enter. An SFC scan will begin which will finish in about 30 to 50 minutes.

Your issue should now be completely resolved after the system file check has finished.
Method 2: Changing Registry Configurations
It is possible that certain Registry Configurations might be corrupted/misconfigured. Therefore, in this step, we will be changing certain Registry Configurations after booting into safe mode. In order to do that:
- Restart your computer and repeatedly press “F8” until the “AdvancedBootMenu” shows up.
- Use the arrow keys to navigate down and highlight the “Use Safe Mode with Networking“.

- Press “Enter” to select the option and wait for the computer to restart.
- Once restarted, login to your account and the Computer will boot into the SafeMode.
- Press “Windows” + “R” and type in “Regedit“.

- Navigate to the following address
HKEY_LOCAL_MACHINE>Software>Microsoft>Windows NT>Current Version>Profile List

- In this folder, there should be two profiles with the same name except one of them will have “.bak” at the end.
- Right-click on the file with “.bak” at its end and select “Rename“.
- Remove the letters “.bak” from its name and press “Enter“.
- Nowright–click on the second file that didn’t have the letters “.bak” in its name.
- Select “Rename” and add the letters “.bak” at the end of its name.
- Now click on the folder from which you just removed the letters “.bak“.
- In the right pane, right-click on “State” and select “Modify”.
- Change the “ValueData” from “8000” to “0” and click on “OK”.
- After this, right–click on “RefCount” and change the ValueData to “0“.
- Click on “OK” and close the Registry Editor.
- Restart your computer and check to see if the issue persists.


Method 3: Disable Customer Experience Program
In certain situations, a certain file might not be uploaded properly to the Customer experience programs due to which this issue is triggered. Therefore, in this step, we will be disabling this setting from the group policy editor. Make sure to follow the steps carefully.
- Press “Windows’ + “R” to open the Run prompt.
- Type in “gpedit.msc” and press “Enter”.
- Expand the “Computer Configuration” pane and then expand the “Administrative Templates”.
- In the right pane double-click on the “System” folder and then on the “Internet Communication Management” folder.
- Open the “Internet Communication Settings” and double click on the “Windows Customer Experience Improvement Program” entry in the right pane.
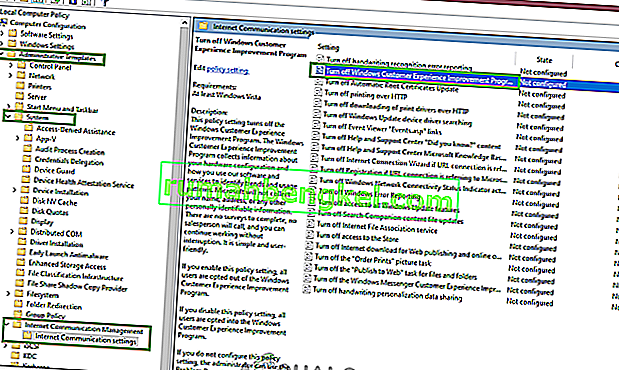
- Select “Enabled” and save your changes.
- Check to see if the issue still persists.

Note: If nothing else works for you, log in with an admin profile, navigate to “C:\Users” and delete all unused profiles in there and check if the issue persists.