This problem usually appears when Windows 10 users want to access data stored on other computers, servers, and networks. After trying to access the server, the following message would appear, indicating that access is not possible:
Server is not accessible. You might not have permission to use this network resource. Contact the administrator of this server to find out if you have access permissions.
There are several methods used by users in order to resolve this problem and we recommend you follow the instructions below carefully.

What Causes the “You might not have Permission to Use this Network Resource” Error?
Check out the list below in order to see the most common causes for this specific problem. Identifying the correct cause is the first step in resolving the problem successfully and you should definitely check this out:
- If you are trying to access a shared printer on the network, you should enable file and printer sharing on the host computer.
- In order to access a remote server or computer, Windows sometimes needs to have a credential in order to trust the connection. Make sure you add it.
- If all computers connected to the network don’t support the same type of encryption, problems like this are bound to occur.
Solution 1: Turning on file and printer sharing
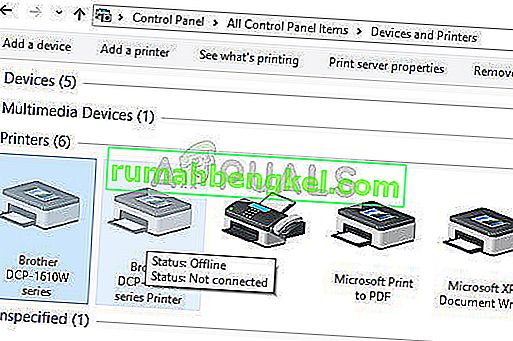
If several computers are connected to a printer, there should be a host PC where the printer is installed. When trying to access the printer from a different computer, you might receive the error message saying you don’t have permission to access the network resource. In order to resolve that, you should definitely check if File and Printer Sharing is turned on for the network.
- Open Control Panel by searching for the utility in the Start button or by clicking the Search button (Cortana) button at the left part of your taskbar (bottom left part of your screen.
- You can also use the Windows Key + R key combo where you should type “control.exe” and click Run which will also open Control Panel directly.

- Switch the View by setting at the top right section of the window to Category and click on Network and Internet at the upper part of the window. Click the Network and Sharing center button in order to open it. Try to find the Change advanced sharing settings button at the left menu and click on it.

- Expand the required network profile (Public or Private) under the “Change sharing options for different network profiles” section.
- Check the File and printer sharing section and set the radio button next to the Turn on file and printer sharing

- Click the Save changes button and make sure you grant administrator permissions. Check to see if the “You might not have permission to use this network resource” error message still appears!
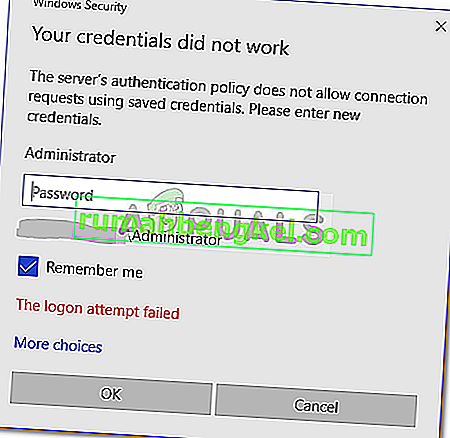
Solution 2: Adding a Windows Credential
If you are trying to connect to a remote server computer and the connection keeps failing, you might want to add a credential which will stop Windows from preventing this connection. In order to proceed, you will need to know the network address, username, and password of the remote computer or server.
- Start up Control Panel by searching for the utility in the Start button or by clicking the Search button (Cortana) button at the left part of your taskbar (bottom left part of your screen.
- You can also use the Windows Key + R key combo where you should type “control.exe” and click Run which will also open Control Panel directly.
- Change the View by option to Large icons at the top right part of the Control Panel window and try to locate the Credentials Manager
- Switch the view from Web Credentials to Windows Credentials and click the Add a Windows credential button under the respective section.

- Enter the remote server computer name (IP address) in the Internet or network address, and enter User name and Password respectively. This will ensure a better connection and hopefully resolve the problem.
Solution 3: Editing LSA Registry Entry
Editing the LSA key in the registry should enable you to connect to the remote computer. This set of steps should be performed on the host computer of the workgroup, homegroup, or any other network with a centralized host computer. Make sure you are careful when handling the keys.
- Since you are going to delete a registry key, we recommend you check out this article we have published for you to safely backup your registry to prevent other problems. Still, nothing wrong will occur if you follow the steps carefully and correctly.
- Open the Registry Editor window by typing “regedit” in either the search bar, the Start menu, or the Run dialog box which can be accessed with the Windows Key + R key combination. Navigate to the following key in your registry by navigating at the left pane:
HKEY_LOCAL_MACHINE\SYSTEM\CurrentControlSet\Control\Lsa

- Click on this key and try to locate an entry named restrictanonymous. If it’s not there, create a new DWORD Value entry called restrictanonymous by right-clicking at the right side of the window and choosing New >> DWORD (32-bit) Value. Right-click on it, and choose the Modify option from the context menu.

- In the Edit window, under the Value data section change the value to 0 and apply the changes you have made. Make sure the Base is set to Decimal. Confirm any security dialogs which may appear during this process.
- Ahora puede reiniciar manualmente su computadora haciendo clic en el menú Inicio >> Botón de encendido >> Reiniciar y verificar si el problema ha desaparecido. Esto probablemente resolverá el problema de inmediato.
Solución 4: habilite el uso compartido de archivos para dispositivos que usan cifrado de 40 o 56 bits
Este método está dirigido principalmente a redes en las que las computadoras constan de varios sistemas operativos diferentes que a veces pueden entrar en conflicto con respecto al cifrado utilizado. Por ejemplo, ciertas versiones de Windows eligen el cifrado de 128 bits por defecto, que no es compatible con otras versiones. De cualquier manera, elija el mismo cifrado para todas las computadoras conectadas para evitar problemas.
- Inicie el Panel de control buscando la utilidad en el botón Inicio o haciendo clic en el botón Buscar (Cortana) en la parte izquierda de la barra de tareas (parte inferior izquierda de la pantalla.
- También puede usar la combinación de teclas Windows Key + R donde debe escribir “ control. exe ”y haga clic en Ejecutar, que también abrirá el Panel de control directamente.
- Cambie la Vista configurando en la sección superior derecha de la ventana a Categoría y haga clic en Red e Internet en la parte superior de la ventana. Haga clic en el botón del centro de redes y recursos compartidos para abrirlo. Intente encontrar el botón Cambiar configuración de uso compartido avanzado en el menú de la izquierda y haga clic en él.
- Expanda la sección requerida Todas las redes en la sección "Cambiar opciones para compartir para diferentes perfiles de red".
- Verifique la sección Conexiones para compartir archivos y configure el botón de radio junto a Habilitar el uso compartido de archivos para dispositivos que usan cifrado de 40 o 56 bits.

- Haga clic en el botón Guardar cambios y asegúrese de otorgar permisos de administrador. Verifique si el mensaje de error " Es posible que no tenga permiso para usar este recurso de red " todavía aparece.