The original ASUS Transformer was certainly a technological revolution, as it took quite a while for the other competitors to catch up. But ASUS Transformer users are often faced with a problem where the device simply won’t turn on.
Now the causes for this can be multiple, but most of the time the issue is either caused by a software conflict or a bad battery. Here’s a list of the most common symptoms:
- ASUS tablet won’t charge
- ASUS tablet won’t go past the ASUS splash screen
- The tablet vibrates when turned on but the screen remains black
- ASUS tablet is stuck in a boot loop
Not having our tabs around is a big inconvenient, so use the guides below to pinpoint the cause of your problem and hopefully restore the functionality of your ASUS Transformer Tablet.
But, before we dive into the technical stuff, let’s perform a series of quick check-ups:
- Make sure your device has enough power in it to start. Leave it charging for at least an hour before attempting to turn it ON.
- Make sure you don’t have any lint or dirt in the power slot of your device, as it might hinder the transfer of electricity. If you see any foreign objects, remove the battery and use a cotton swab dipped in rubbing alcohol to get rid of them.
- Make sure your power adapter isn’t broken. Try to borrow another compatible charger for your ASUS tablet or plug it into a USB port, and see if it charges.
- If you recently installed a screen protector, make sure the proximity sensors aren’t covered by it. This will cause your screen to remain black.
Method 1: Fixing the Power Button
Some ASUS Transformer models suffer from a design flaw that causes the power button to get stuck within the casing of the tablet. This is extremely common on ASUS Transformer T100. If that’s the case, the button will be further inside and you won’t be able to push it like you normally would. Here’s what you need to do:
- Separate the tablet from its dock by pressing the large silver button located below the tablet and remove it away from the base.
- Use your nails or a plastic opening tool to pry upwards into the seam of the tablet casing. Push until you feel the clips release.
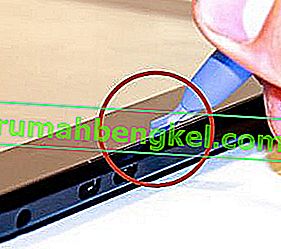
- Repeat the procedure on all four edges until all the clips are released. Do it carefully so you don’t break any of them.
- Remove the rear casing and use a flathead screwdriver to push the button connection up. Start slowly and gradually increase the power until you hear the button pop back into place.
- Reassemble the device and push the power button again to see if it’s working properly.


Method 2: Unplugging the battery connector
If your Asus tablet is totally unresponsive, try plugging it into a charger. If the orange charge light does not appear on the power button, try inserting the device into its dock. If the dock signals that it’s charging, the problem is certainly related you your device’s battery.
In cases like this, it’s worth a shot to disconnect the battery before hooking it up again and see if it fixed your problem. This problem usually occurs when the device has come into contact with a tiny amount of water or it has been stored in a humid environment. Disconnecting the battery connector will signal the device to stop protecting itself and allow power to the rest of the components.
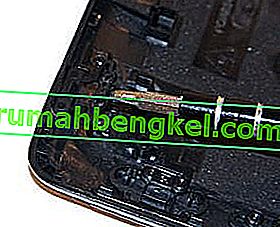
Warning: The following steps should only be taken if your warranty has expired. This tutorial involves removing the warranty sticker which leads to your device losing warranty. Here’s what you need to do:
- Un-dock your device and remove its back cover.
- You should see a gold cover on the back with a small yellow warranty sticker. If you don’t see the yellow warranty sticker, it was probably already removed.
- Remove the yellow sticker and open the gold cover.
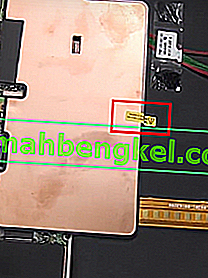
- As soon as the gold cover is removed, you should notice the connector that links the battery to the motherboard.
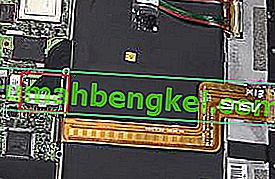
- Unplug it carefully, wait a while and plug it back in again.
- Reassemble your ASUS tablet and see if it turns ON.


Method 3: Doing a trickle charge
It’s possible that your battery has been allowed to so become flattened to the point where it can’t accept a regular charge from a wall charger. In cases like this, you either go for a battery replacement or you opt for a trickle charge. It is proven that lithium batteries don’t like being fully discharged. If the battery is drained completely, chances are the device won’t accept a charge from your regular Asus a/c charger.
A trickle charge involves charging your tablet from a low voltage connection. This means you either charge it from a PC USB port or from a low power charger that works with 5v/500ma. Here’s what you need to do:
- Plug your device into a PC USB port or a low power charger.
- Let it charge for around 10 hours. If you opted for a USB port charge, don’t let your PC go into sleep mode.
- Plug it back into your regular a/c charger and see if it has enough charge to recognize and accept a higher voltage.
- If it recognizes the charger, leave it to charge for another 10 hours before powering it on again.
Method 4: Doing a Soft Reboot
If you can hear the device powering on but the screen remains black, follow the instructions below:
- Hold the Volume down button for about 2-3 seconds and then press and hold the Power button.
- Keep them both pressed until you see the screen powering on. Once you see the ASUS splash screen, let go of both buttons.
- Press the Volume Up button again. Don’t hold it, just press it once.
- Your device should restart and boot up normally.
Method 5: Doing a Soft Reset & a Hard Reset
If your device is frozen, unresponsive or is stuck in a continuous boot loop, this might help. Start by doing a soft reset and see if it solves your problem. Here’s how:
- Hold the power button.
- When the screen goes black, release the power button.
- If it manages to boot up, make your way to Settings > About device and update to the latest software available.
If the soft reset didn’t help, let’s try a hard reset. Keep in mind that a hard reset is exactly like a factory reset, only that it’s done via the hardware buttons. Follow the steps below :
- Power off your ASUS Transformer device.
- Press and hold the Volume down button + the Power button.
- Release both buttons when you see the green android image appearing.
- Use the volume keys to navigate downwards and highlight the setting named “Recovery mode“.
- Press the Power button to select it.
- You should see a screen that says “No command”.

- Press and hold Volume Up + Power button until the new menu appears.
- Use the volume buttons to navigate to “wipe data/factory reset” and press the power button to make that selection.
- Use the volume buttons again to highlight “Yes” and press the power button again to confirm.
- The hard reset will now start. It will take a while. When the process is complete, you will be prompted to initiate a reboot.

We hope one of the fixes above has fixed your ASUS tablet related problem. If nothing worked, your device needs to be sent for repair.